C# – Creating an Excel Addin with User Defined Functions
Overview
Background
In one of my previous posts, I demonstrated how to create a simple VSTO Addin for Excel that adds a button on the ribbon. In this post, I am going to show how to add a user defined functions using Excel-DNA as well as use the ribbon functionality.
My Stack
- Visual Studio 2019 Community.
- .NET Framework 4.7.2 / C#
- Office 365, Desktop Edition.
- Windows 10 Pro 64-bit (10.0, Build 19041)
User Defined Function (UDF)
Excel provides a large set of built in functions, giving a user the ability to perform various calculations and manipulations on the data. But what happens if a user needs a custom calculation, that needs to be used over multiple cells? Starting Excel 2002, Microsoft introduced the User Defined Functions. This capability enables you to wrap some common calculation or string manipulation in a function and call it transparently as any other Excel build-in function.
Example
Lets say we want to reverse a string in a cell. There are lot of examples of how to do that using the Excel built in functions. One of the examples is using TEXTJOIN function:
1=TEXTJOIN("",1,MID(A1,ABS(ROW(INDIRECT("1:"&LEN(A1)))-(LEN(A1)+1)),1))
Additional techniques could be found on ExcelJet.
Much cleaner alternative would be creating a UDF that does this in C# and calling the function from the Excel spreadsheet with:
1=ReverseString(A1)
Creating an Excel Addin that supports UDF
From Visual Studio menu, create a new .NET Framework Class Library project.
Installing dependencies
- First we need to reference the Excel-DNA project that enables us to make native XLL addins using C#. In the Visual Studio Package Manager Console type:
1Install-Package ExcelDna.AddIn
Note: After installing the ExcelDna.Addin package, your project extension will be changed to xll which is a format for an addin that adds UDF functionality. You can read more about the XLL addins on MSDN.
- Since we want to create also some visual components and interact will the Excel elements we need to add the reference to: Microsoft.Office.Interop.Excel.dll. This component is usually located in your Office directory.
Setting up the control classes
Since we want to combine the ExcelDna.Addin and the Ribbon objects, we can't use the regular VSTO, but need to create the control classes manually.
- Create a class that implements the
ExcelDna.Integration.IExcelAddIninterface.
 1public class ExcelRibbonUDFAddin : IExcelAddIn
 2{
 3  public void AutoOpen()
 4  {
 5    // startup code
 6  }
 7
 8  public void AutoClose()
 9  {
10    // clean up
11  }
12}
- Create the ribbon controller class that derives from
ExcelDna.Integration.CustomUI.ExcelRibbonbase class.
 1[ComVisible(true)]
 2public class RibbonController : ExcelRibbon, IDisposable
 3{
 4  private Microsoft.Office.Core.IRibbonUI _ribbonUi;
 5
 6  private Application App
 7  {
 8    get => (Application)ExcelDnaUtil.Application;
 9  }
10
11  public override string GetCustomUI(string ribbonID) =>
12      @"<customUI xmlns='http://schemas.microsoft.com/office/2009/07/customui'>
13          <ribbon>
14             <tabs>
15              <tab id='sample_tab' label='GoTask'>
16                <group id='sample_group' label='Operations'>
17                  <button id='do_reverse_range' label='Reverse' size='large' getImage='OnDoReverseGetImage' onAction='OnDoReverse'/>
18                </group>
19              </tab>
20            </tabs>
21          </ribbon>
22        </customUI>";
23
24  public void OnLoad(Microsoft.Office.Core.IRibbonUI ribbonUI)
25  {
26    _ribbonUi = ribbonUI;
27  }
28
29  public void Dispose()
30  {
31  }
32}
- ExcelDnaUtil.Application returns the Excel Application object instance.
- GetCustomUI returns the Ribbon XML string. You can find the full specification regarding the
Adding the UDF functionality
Create a new static class that will contain the Reverse string function implementation. Make sure that you add ExcelFunction attribute to it.
Every time you add =ReverseString to any cell in the Excel, this function will be called.
 1public static class CustomFunctions
 2{
 3  [ExcelFunction(Description = "Reverse string function")]
 4  public static string ReverseString(string str)
 5  {
 6    var charArray = str.ToCharArray();
 7    Array.Reverse(charArray);
 8    return new string(charArray);
 9  }
10}
Testing the project

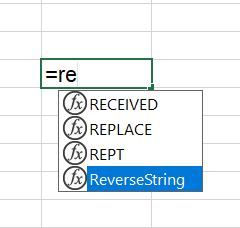
Excel functions intellisense
-
Build the project and run it in Debug mode. This should open the Excel application with the addin loaded.
-
Go to some cell and type
=ReverseStringpassing a reference to a cell or hard coded string. -
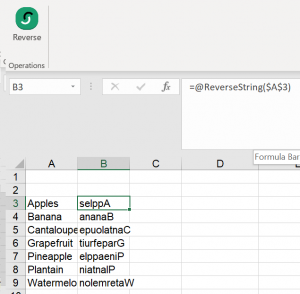
Your target cell should contain the reversed string. Since you are running in the debug mode, you can always set a breakpoint in the ReverseString function.
Adding the reverse function to an existing range
After we built the basic sample, we can connect it to a button on the ribbon that reverses the string of the selected range and inserts the results to the new column.
For this, we need to implement the ribbon button action function in the Ribbon Controller class:
 1public void OnDoReverse(Microsoft.Office.Core.IRibbonControl control)
 2{
 3  var selectedRange = App.Selection;
 4
 5  if (selectedRange == null) return;
 6
 7  foreach (Range cell in selectedRange)
 8  {
 9    var next = cell.Offset[0, 1];
10    next.Formula = $"=ReverseString({cell.Address})";
11  }
12}

Reverse string in Excel Result
Useful resources
- Source code of this project on GitHub