C# VSTO Addin Sample for Excel, Word, Power Point, Outlook
Overview
Background
Microsoft Office provides a variety of component types you could develop to extend its existing functionality or to add more useful features. These components include VBA macros, VSTO components, XLL Addons, and more.
In this sample, I will focus on creating a C# VSTO project that displays a simple ribbon.
My Stack
- Visual Studio 2019 Community.
- .NET Framework 4.7.2 / C#
- Office 365, Desktop Edition.
- Windows 10 Pro 64-bit (10.0, Build 18362)
Minimal requirements
- Visual Studio 2015
- Office 2013
The full source code available at GitHub
Note that the following Ribbon sample can be used for extending these Office applications: Excel, Word, Outlook, and PowerPoint.
In this post, I will use Excel as a hosting application.
Setting up the environment
- Open Visual Studio 2019 and create a new Excel VSTO Addin C# project.
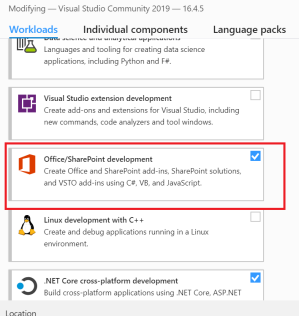
Visual Studio Setup for Office/SharePoint
In case you cannot find such a project on a Visual Studio templates list, complete the following steps:
- Open the Visual Studio 2019 setup from the Windows Control Panel.
- Make sure Office/SharePoint development option is selected as shown in the picture.
- In the generated project, open the
ThisAddin.csfile:
ThisAddIn_Startupevent handler will be called by the Excel application only once in the hosting application lifetime, during the application startup. This is the recommended place for initialization.ThisAddIn_Shutdownevent handler will be called by the application before it exits. Do your cleanups here.
_Note: Outlook no longer raises this event. If you have code that must run when Outlook shuts down, see this link.
 1public partial class ThisAddIn
 2{
 3    private void ThisAddIn_Startup(object sender, System.EventArgs e)
 4    {
 5    }
 6
 7    private void ThisAddIn_Shutdown(object sender, System.EventArgs e)
 8    {
 9    }
10
11    #region VSTO generated code
12      /// summary
13      /// Required method for Designer support - do not modify
14      /// the contents of this method with the code editor.
15      /// /summary
16      private void InternalStartup()
17      {
18        this.Startup += new System.EventHandler(ThisAddIn_Startup);
19        this.Shutdown += new System.EventHandler(ThisAddIn_Shutdown);
20      }
21    #endregion
22}
Testing the environment
- Set a breakpoint in both
C#ThisAddIn_StartupandThisAddIn_Shutdownfunctions. - Hit F5 to run the project's debugger. An Excel splash screen should appear and shortly after
ThisAddIn_Startupbreakpoint will hit. - Close the Excel application,
ThisAddIn_Shutdownshould hit.
Adding the Ribbon
When developing a VSTO, I prefer creating the ribbon by manually creating the XML rather than using the Ribbon Designer, which covers only a subset of the OfficeFluentUI model.
You can find more explanations of the difference between using the Ribbon Designer and manually building the XML in these links: xml vs ribbon designer and xml to ribbon designer comparison.
Ribbon Controller
- Add a new class RibbonController implementing
Microsoft.Office.Core.IRibbonExtensibilityinterface. - Make sure to set the
[ComVisible(true)]class attribute. - The only function you should implement is
GetCustomUIthat returns the XML representation of the ribbon you wish to create. - For this sample, we will create a simple button that display a message box.
 1[ComVisible(true)]
 2public class RibbonController : Microsoft.Office.Core.IRibbonExtensibility
 3{
 4    private Microsoft.Office.Core.IRibbonUI _ribbonUi;
 5
 6    public string GetCustomUI(string ribbonID) =>
 7    @"<customUI xmlns='http://schemas.microsoft.com/office/2009/07/customui'>
 8      <ribbon>
 9        <tabs>
10          <tab id='sample_tab' label='GoTask'>
11            <group id='sample_group' label='Operations'>
12              <button id='do_1' label='Do 1' size='large' getImage='OnDo1GetImage' onAction='OnDo1Click'/>
13            </group>
14          </tab>
15        </tabs>
16      </ribbon>
17      </customUI>";
18
19    public void OnLoad(Microsoft.Office.Core.IRibbonUI ribbonUI)
20    {
21        _ribbonUi = ribbonUI;
22    }
23
24    public void OnDo1Click(Microsoft.Office.Core.IRibbonControl control)
25    {
26        MessageBox.Show(Resources.Do1Action);
27    }
28
29    public Bitmap OnDo1GetImage(Microsoft.Office.Core.IRibbonControl control) => Resources.Do1_128px;
30}
The sample XML above adds the ribbon to the Excel application, which includes:
- A new ribbon tab labeled
GoTaskcontaining a new group labeledOperations. - The group containing a button labeled
Do 1with click handler implemented inOnDo1Clickfunction. - The button displaying an image located in the Resource section.
Notes for onAction callback function:
- It must be public and have the following signature:
public void SomeName(Microsoft.Office.Core.IRibbonControl control) - You could use any valid name, however it must match the name provided in
onActionattribute in XML. - For the proper initialization of the Ribbon, add
OnLoadfunction, which will be called by the hosting application once the ribbon is ready to show.
Creating an Instance of the Controller class
Once we have the RibbonController class, we need to create the instance of it.
This is done by overriding the CreateRibbonExtensibilityObject() function in the ThisAddIn class.
1protected override IRibbonExtensibility CreateRibbonExtensibilityObject() = new RibbonController();
Running the project
- Hit F5 to run the project again.
- The Excel Application should show the ribbon with a new button.

VSTO Excel Sample ribbon with button
Useful resources
- Full source code of this post in GitHub
- Full documentation of Ribbon XML
- Ribbon Designer documentation
- Office applications that supports VSTO Addins.