Setup Hugo Site Generator on GitHub Pages with a Custom Domain
Background
Recently, I wanted to setup a new blog. I have purchased the domain and started looking for the hosting.
My main goal was to build a clean and a simple site that loads fast. Instead of working with the traditional WordPress platform and trying to configure dozens of plugins to increase the performance, I decided to go with a Jamstack based solution. Jamstack based sites are pre-generated and served from the static repositories or CDNs, so no pages are generated on the fly when the users access the site.
To pre-generate the site, I chose Hugo, which is a static site generator optimized for speed and relatively easy to configure. Hugo is an open source project written in Go language.
Since the site is pre-generated and can be stored in the GitHub, I chose the GitHub Pages as a hosting. The deployment on GitHub Pages is very simple (a single git push) command, it can setup a custom domain and it has the built-in support for SSL.
Requirements
- Git installed on your local machine (including the command line interface)
- GitHub account
- If you wish to setup a 'private' repository with the custom domain, you will need to purchase one of the GitHub subscriptions. I use the 'Team' subscription which costs 4$ per month (as of Dec/2020). You may check the pricing for more information.
- A Text editor, I use Notepad ++
- A basic command line knowledge
Setting up the repository
Installing Hugo on the local computer
As described in the Hugo Git repository, there are two ways to install the Hugo site generator on the local machine:
- Install binary files using one of the common Package Managers
- Build from the sources
For this post we will proceed with the binary files' installation. Since I am using Windows 10 operating system, I used the Chocolatey Package Manager. I installed Chocolatey as an Administrator as described in the install page.
For Mac/Linux users, I recommend working with Homebrew.
After having the package manager installed, we can use a command line to install the Hugo site generator.
Windows
Open the command line prompt as an Administrator and type:
1choco install hugo -confirm
Mac/Linux
1brew install hugo
More instructions for the Hugo installation
Setting up the repository on GitHub
Since Hugo is pre-generated site and served from a Git repository, we need to create a new repository on GitHub.
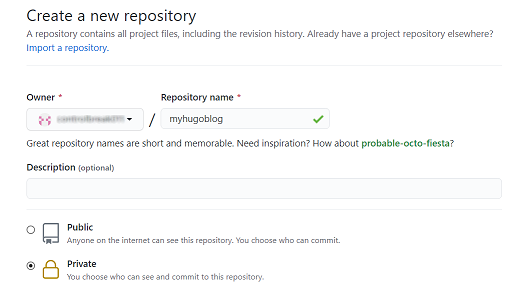
Create new private repository in GitHub
- In your web browser, go to https://github.com/new.
- Choose the name for the repository. For this example, we are going to use:
myhugoblog - Since we are not creating an open source project, but the repository that will contain my blog, we will set the repository to 'Private'. This step is not mandatory as you can setup the site and the custom domain with public repositories as well.
Setting up the local directory for the site
- Create a local directory that will contain the theme and the pre-generated site. For this example, we will use:
c:\sites\directory. - Open the command line prompt at
c:\sites\and type:
1git clone https://github.com/<user_name>/<repository_name>.git
Note: In some cases, you might get an error that repository does not exists. In such case, try to clone with following url (you will be prompted for the password):
1git clone https://<user_name>@github.com/<user_name>/<repository_name>.git</code>
Generate new Hugo site
At this stage, we have an empty repository connected to our local directory. Now we need to generate the Hugo site.
- In the command line prompt make sure that the current directory is
c:\sites\and type:
1hugo new site myhugoblog --force
- Important note: The root directory of the repository in Git and the root directory of the pre-generated site must be the same.
Choosing the Hugo theme
Hugo site generator has a few hundreds of free themes available. I decided to go with Bodhi blog theme. It is clean, simple and minimalistic. A perfect solution for my new blog.
- Download the zip archive of the theme from the theme repository. In our case, it is https://github.com/rhnvrm/bodhi/archive/master.zip
- Extract the zip file to
c:\sites\<repository_name>\themes. In our case, it'sc:\sites\myhugoblog. - Typically, your directory name in the zip file will be:
<theme_name>\_master. Remove the_mastersuffix from the directory name. In our case, we will havec:\sites\myhugoblog\themes\bodhidirectory. - Open the
config.tomlfrom the site root directory in the text editor and paste the default configuration of the theme as described in your theme page. Please note that different themes might have different configurations options.- Make sure you change the baseUrl property to your custom domain url.
- Make sure you add/change the default publish directory in the
config.tomltopublishDir = docs
- To run the site locally type the following in your command prompt:
1 hugo server
- Open your browser at
http://localhost:1313/to see the site. Currently it should have only the theme's default page. (Note that the port might be different. Check the console window for the exact address). - If you are happy with the site, press
CTRL + Xto kill the server.
Deploying the site to Git repository
Once we have the site running locally, we need to build it (generate the static pages, links, sitemap) and push it to the remote repository.
- Open the root directory of the site in the command prompt:
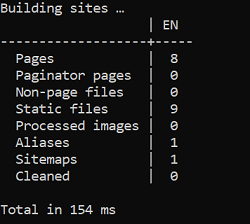
Build Hugo site console output
- To build the site, type:
1hugo
- Type the following git command to add the new files to the repository, commit and push:
1git add .
2git commit -m "Added theme"
3git push origin
Note that you need to repeat this process every time you make any change to the site.
Connecting to GitHub Pages
Once we have the repository set, we need to enable the GitHub Pages capability for our repository.
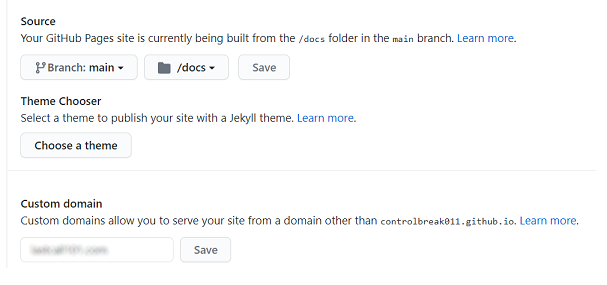
GitHub Pages Settings for Branch and Custom Domain
- In your web browser, go the 'Settings' page of your repository.
- At the bottom of the page (make sure you scroll down), you fill find GitHub Pages section.
- Choose the
mainbranch and the/docsdirectory. - Click 'Save'
- In the 'Custom Domain' section, type your domain name (without http/https).
- Click 'Save'
- Note that https (ssl) support comes out of the box, but you will need wait up to 24 hours until your certificate is generated. Make sure 'Enforce HTTPS' option is checked.
Configuring your DNS
The last but not the least part we need to perform is to setup our domain's DNS settings to work with GitHub pages. I registered my domain via NameCheap domain registrar, but this process can be done from any domain registrar.
All we have to do is to setup a few 'A Records' and 'CNAME record' to work with GitHub pages.
In your domain management screen, open your Advanced DNS settings screen.
- Create 'A Record' for @ host with
185.199.108.153value. - Create 'A Record' for @ host with
185.199.109.153value. - Create 'A Record' for @ host with
185.199.110.153value. - Create 'A Record' for @ host with
185.199.111.153value. - Create 'CNAME Record' for @ host with
<username>.github.iovalue.
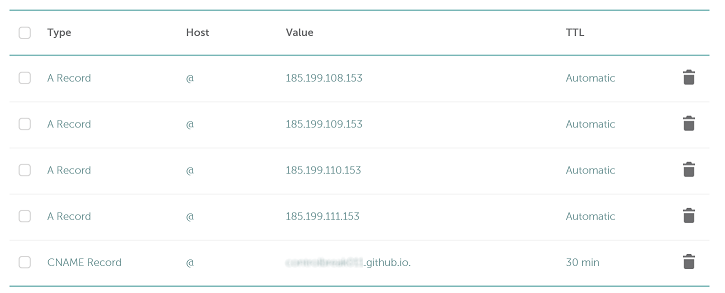
Namecheap Advanced DNS For GitHub Pages
Testing the site
Type your domain in the web browser, the site should appear 🙂